Working with Wire and Tinsels
What you will need:
1. Hooks of your choice. Straight shanked hooks will be best to begin with.
2. Thread of choice.
3. Wire and tinsel scissors. These are not special scissors, just an old pair. Wire and tinsel will quickly dull your good scissors. It is a good idea to have one pair just for working with wire and tinsel.
4. Wire, both small and larger gauges.
5. Flat tinsel. See below for options.
What you should already know:
1. You should be comfortable with the content of lesson 1 and lesson 2.
2. You should be able to form nice smooth layers thread along the hook shank.
1. You should be comfortable with the content of lesson 1 and lesson 2.
2. You should be able to form nice smooth layers thread along the hook shank.
What you will learn:
1. You will learn to form a rib of wire on your fly.
2. You will learn to form a body of wire on your fly.
3. You will learn to form a rib of tinsel on your fly.
4. You will learn to form a body of tinsel on your fly.
1. You will learn to form a rib of wire on your fly.
2. You will learn to form a body of wire on your fly.
3. You will learn to form a rib of tinsel on your fly.
4. You will learn to form a body of tinsel on your fly.
Alright, now that you have practiced with your thread work and have gotten more comfortable with some of your tools, it is time to add the dimension of wire and tinsel to your tying skill set. I have grouped the wires and tinsels together as the methods for tying with them are quite similar as is the practical uses for adding them to your created flies.
The uses of wire or tinsel:
The uses of wire and tinsel are closely related. The most notable use is that it adds "flashy color" to the fly. Any fly or lure to catch fish can often be upgraded with a bit of flash. The flash is attractive to fish. Maybe it just catches the fish's attention. Or it might be the flash mimics movement and adds to the life of the fly. In the case of a wet fly some will argue that the flash gives off the appearance of bubbles along the fly body which are often seen in emerging insects. Whatever the case...flash can help your fly. You will see flies with a lot of flash or just a touch of flash. This is up to you, what you are trying to imitate and the conditions of the water or sunlight available.
Another use of wire and tinsel is to create a segmented appearance on your fly. As we discussed in the Lesson 2 : Working with Thread, segmentation adds to the natural imitative property of the fly as well as the appearance of depth.
A third use of the wire and tinsel is to reinforce the construction of the fly. A wire rib or tinsel rib makes it difficult for a fish's toothy mouth to tear apart the fly and can be used to help hold other materials in place.
Wire and tinsel can also serve the purpose of adding weight to your wet fly. The more you put on your fly the heavier it will be. If you want a fly that sinks readily, select a heavy hook and wire body. If you want a wet fly that sinks, but not too deep, choose a lighter wire hook and add just a rib of wire or tinsel. It is all good! Let me reiterate the motto "Tying with a purpose". Think of your purpose for adding the wire or tinsel ahead of time and select the method and material to get you there.
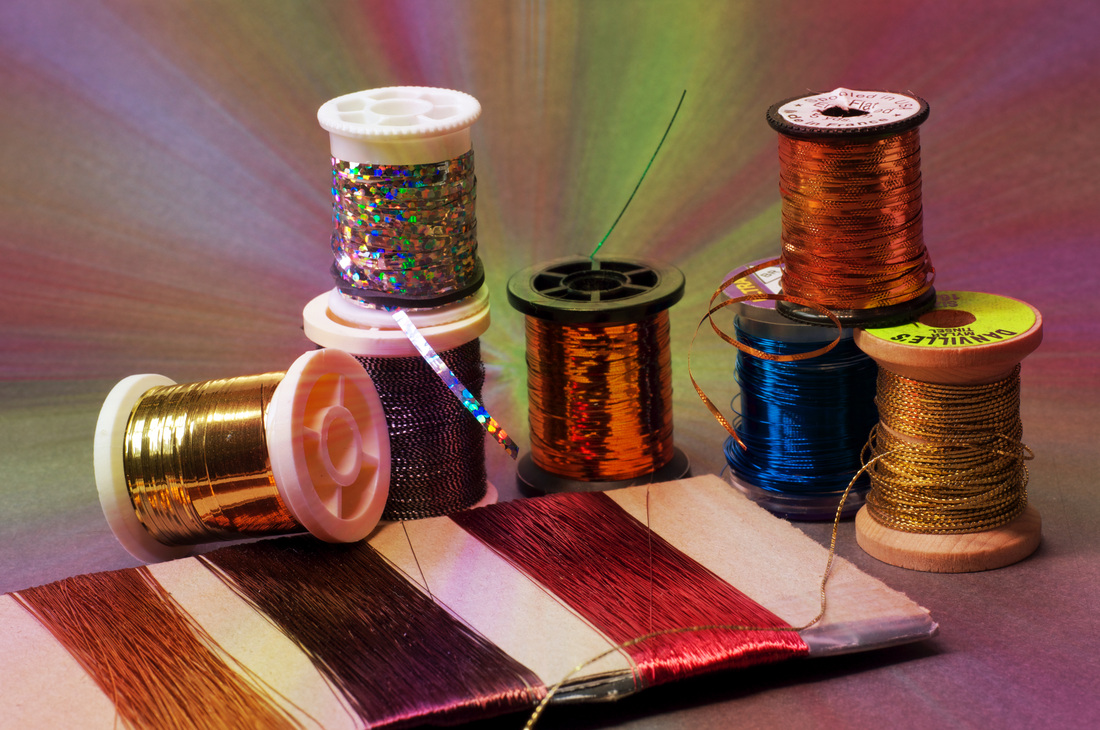
Types and sizes of wire and tinsel:
The wire and tinsels available are numerous. Most fly shops have rows upon rows of different types and brands as does the local hobby or craft store. The most commonly used colors are gold and silver. These two could completely satisfy your needs for all the uses stated above. The reality is though we fishermen and fisherwomen are just attracted to all the flash as the fish and it doesn't take long to get a good collection started. Wire and tinsel come in every color and degree of "shininess" you can imagine as well as size. Sizes for both wire and tinsel found in fly shops are usually labeled x-small, small, medium and large. Tinsels are the same, but can also be labeled roughly coordinated to the size of the fly you are tying: 16/18, 14, 12 etc. They come on a bobbin just like your thread and from most of the same brands as your thread. UTC thread makes a Ultra-wire, Danville makes both thread and tinsels and on and on. Wire from your local craft store will usually be labeled by a gauge number. The higher the gauge number the smaller the diameter of the wire. A large diameter wire on a spool might be around a 26 gauge wire at your craft store.
In this lesson we will be working with wire and flat tinsel. There are other choices such as "braid" which is fine tinsel woven around a thread core. This gives you a flexible option at larger diameters and "embossed" tinsels which are flat tinsels stamped with a design pattern. You will see braid used on some patterns and as a rib over a flat tinsel body as it adds a lot of depth and durability to the fly. Embossed tinsel is more commonly used on flies tied for artistic purposes.
The uses of wire or tinsel:
The uses of wire and tinsel are closely related. The most notable use is that it adds "flashy color" to the fly. Any fly or lure to catch fish can often be upgraded with a bit of flash. The flash is attractive to fish. Maybe it just catches the fish's attention. Or it might be the flash mimics movement and adds to the life of the fly. In the case of a wet fly some will argue that the flash gives off the appearance of bubbles along the fly body which are often seen in emerging insects. Whatever the case...flash can help your fly. You will see flies with a lot of flash or just a touch of flash. This is up to you, what you are trying to imitate and the conditions of the water or sunlight available.
Another use of wire and tinsel is to create a segmented appearance on your fly. As we discussed in the Lesson 2 : Working with Thread, segmentation adds to the natural imitative property of the fly as well as the appearance of depth.
A third use of the wire and tinsel is to reinforce the construction of the fly. A wire rib or tinsel rib makes it difficult for a fish's toothy mouth to tear apart the fly and can be used to help hold other materials in place.
Wire and tinsel can also serve the purpose of adding weight to your wet fly. The more you put on your fly the heavier it will be. If you want a fly that sinks readily, select a heavy hook and wire body. If you want a wet fly that sinks, but not too deep, choose a lighter wire hook and add just a rib of wire or tinsel. It is all good! Let me reiterate the motto "Tying with a purpose". Think of your purpose for adding the wire or tinsel ahead of time and select the method and material to get you there.
Types and sizes of wire and tinsel:
The wire and tinsels available are numerous. Most fly shops have rows upon rows of different types and brands as does the local hobby or craft store. The most commonly used colors are gold and silver. These two could completely satisfy your needs for all the uses stated above. The reality is though we fishermen and fisherwomen are just attracted to all the flash as the fish and it doesn't take long to get a good collection started. Wire and tinsel come in every color and degree of "shininess" you can imagine as well as size. Sizes for both wire and tinsel found in fly shops are usually labeled x-small, small, medium and large. Tinsels are the same, but can also be labeled roughly coordinated to the size of the fly you are tying: 16/18, 14, 12 etc. They come on a bobbin just like your thread and from most of the same brands as your thread. UTC thread makes a Ultra-wire, Danville makes both thread and tinsels and on and on. Wire from your local craft store will usually be labeled by a gauge number. The higher the gauge number the smaller the diameter of the wire. A large diameter wire on a spool might be around a 26 gauge wire at your craft store.
In this lesson we will be working with wire and flat tinsel. There are other choices such as "braid" which is fine tinsel woven around a thread core. This gives you a flexible option at larger diameters and "embossed" tinsels which are flat tinsels stamped with a design pattern. You will see braid used on some patterns and as a rib over a flat tinsel body as it adds a lot of depth and durability to the fly. Embossed tinsel is more commonly used on flies tied for artistic purposes.
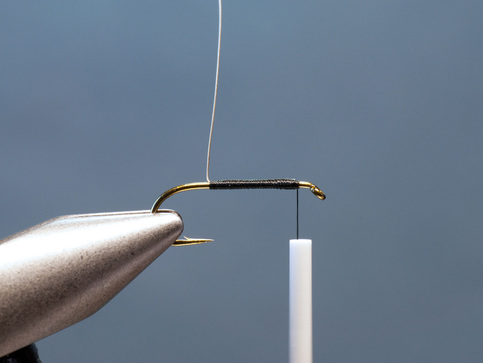
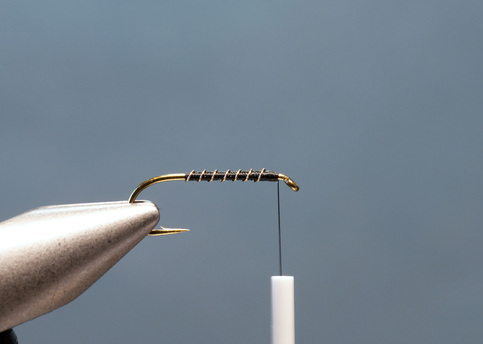
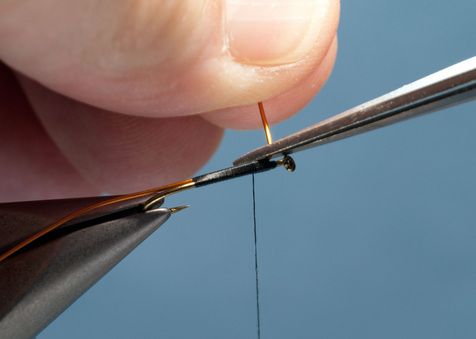
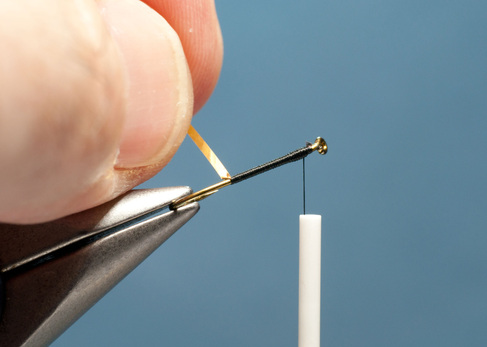
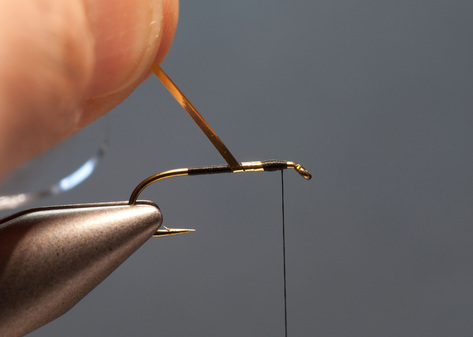
Creating a wire rib.
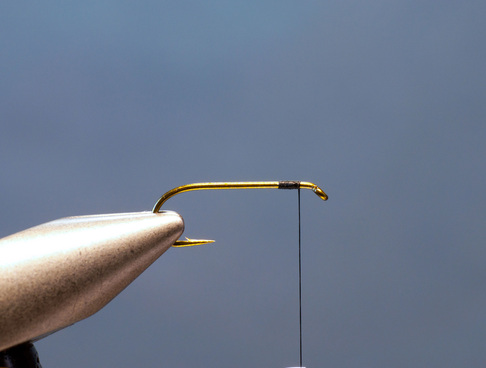
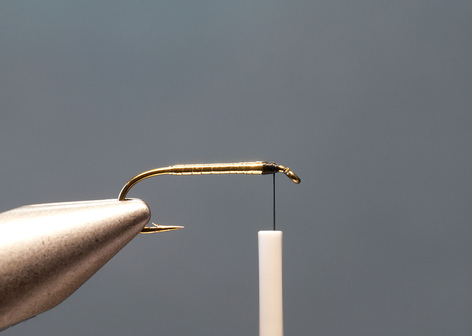
Start by attaching your thread to the hook shank as in Lesson #1.
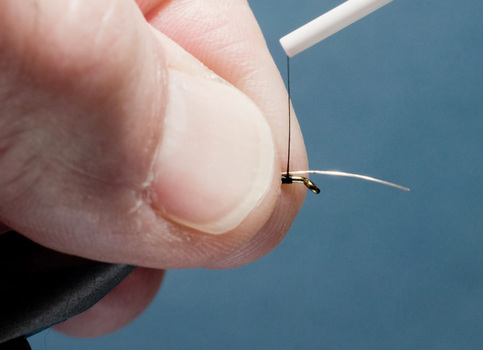
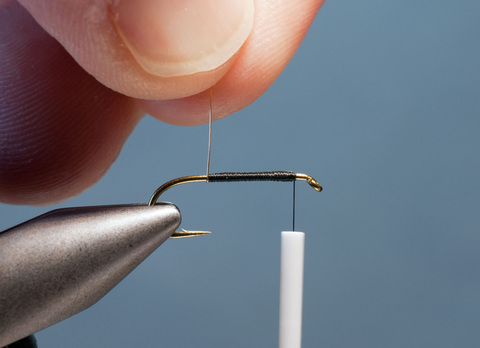
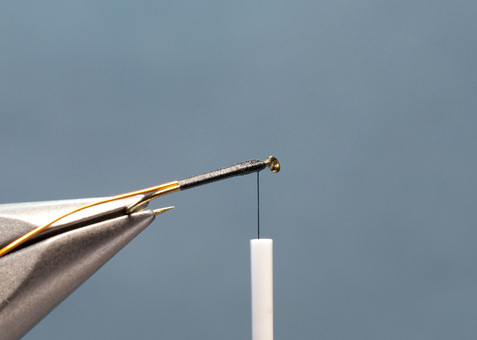
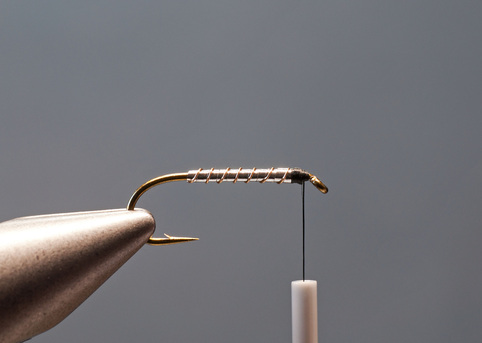
Holding your wire along the top of the hook shank between your thumb and forefinger bring your thread up and over the wire at the point you want to tie in at. You are wrapping in a clockwise motion looking directly at the front of the hook. As you wrap over the wire, gently let it roll to the back side of the hook shank. After several tight wraps towards the back of the hook, the wire should be secured in on the back side of the hook. Most aquatic insects are flattened ventrically so we want to wrap the wire along the side of the hook shank as it will give the finished fly a slightly flattened profile.

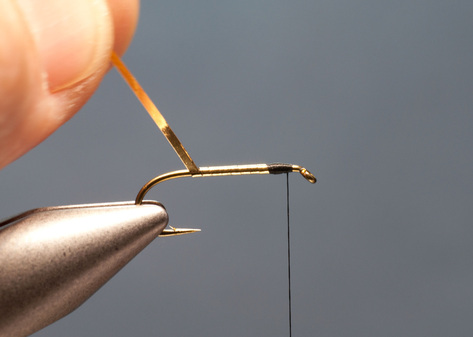
Continue wrapping the wire down the length of the hook shank along the back side.
NOTE: It is very important that while doing this you make an attempt to wrap a very smooth body. These wraps will make up the underbody of the fly. Any big "bumps" or irregularities will show in the finished fly.
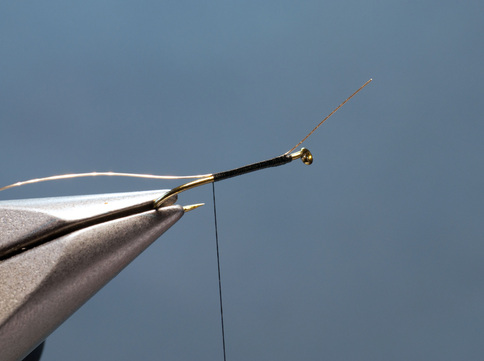
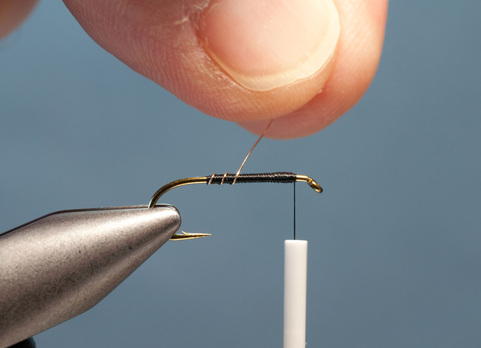
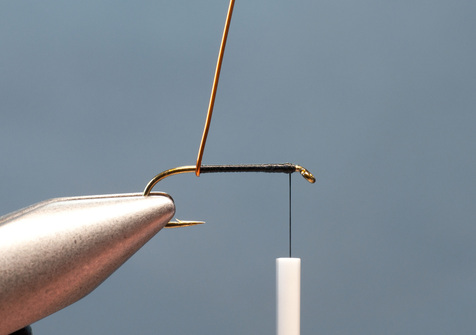
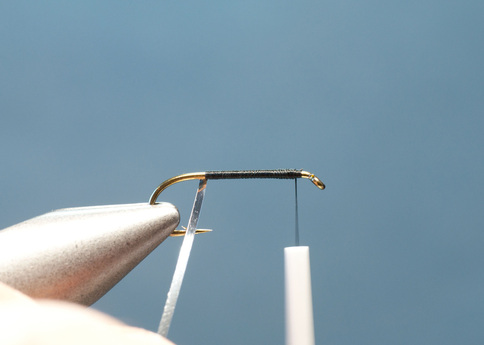
Secure the wire to the point where you would like the ribbing to begin. Usually at the far rear of the fly.
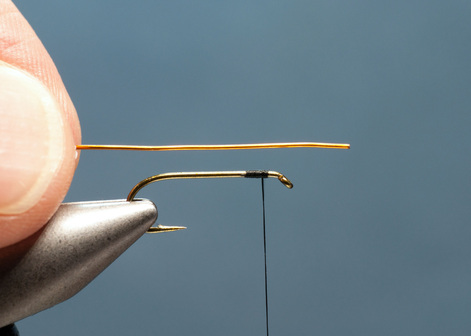
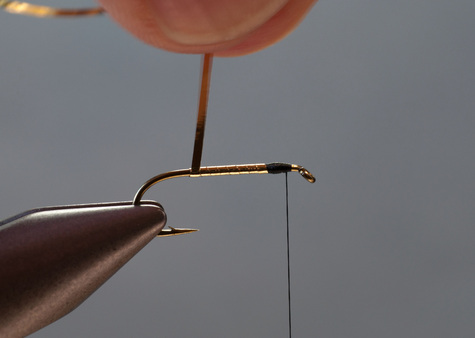
Here I am giving you a look at what you might see looking down on the fly. The wire is secured in along the back side to a spot just above the point of the hook. A good place to stop.
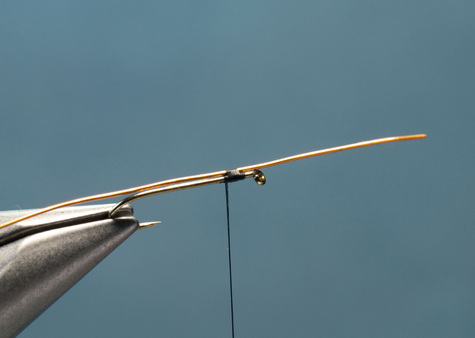
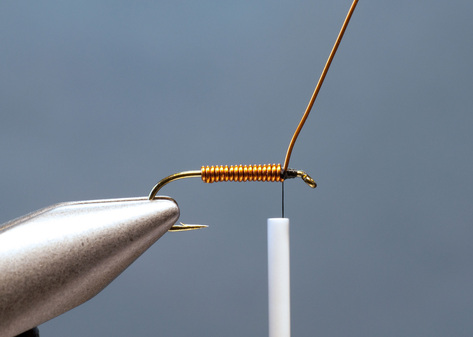
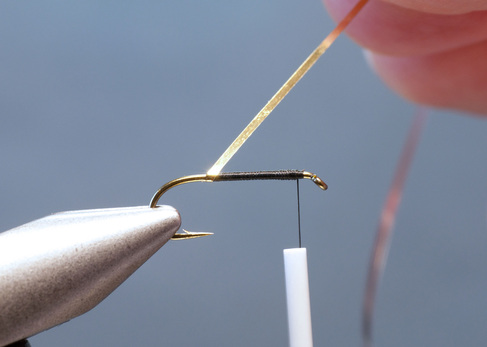
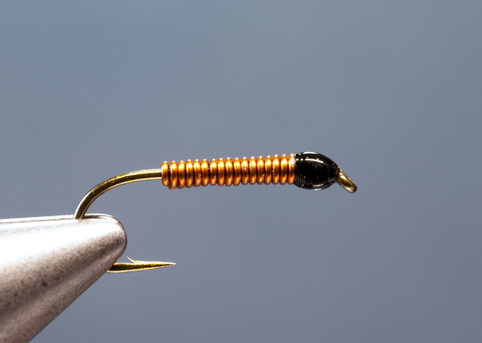
In controlled smooth even wraps move your thread forward to the front of the hook shank. Lift the rear tag of wire to a 90 degree angle to the hook shank. Trim away the wire tag at the front.
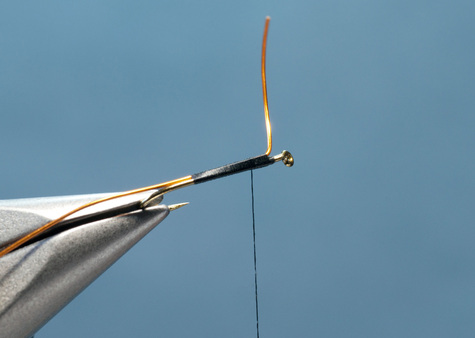
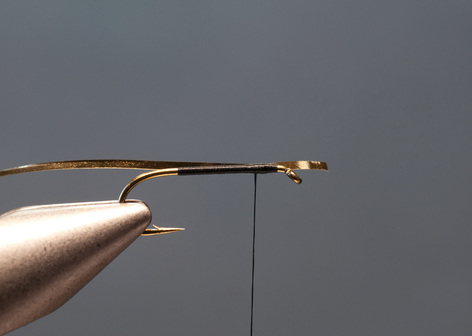
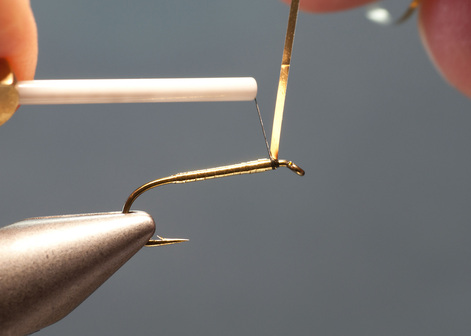
Holding the wire tag from the back side, bring the wire underneath the hook shank and back up. Again we are wrapping in a clockwise manner from the front of the hook.
Continue to make nice even wraps of the wire forward. You may need to switch hands on the wire as you do this. If you were to just grab the wire with your right hand and wrap...each wrap of the wire would also twist the wire. This could weaken the wire and cause it to break on you. The distance between wraps and the amount of wraps you make is up to you. More wraps equals more weight, more flash and a more durable fly.
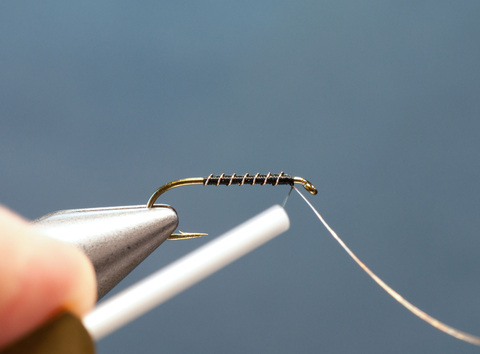
Once at the front of the hook, secure the wire with your thread.
Trim off the tag of wire and neatly finish covering the wire end with thread.
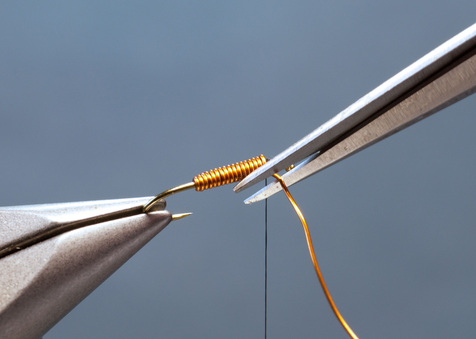
Forming a body of wire.
Sometimes you will want your fly to have a full body of wire. Most often this will be best achieved with a little heavier wire than what we might select for a rib on our fly. Heavier wire is a little more difficult to work with and still come out with a nicely form body.
Attach the wire along the back of the hook shank .
Use the same manner as described above in the rib tutorial.
Securely attach the wire along the shank of the hook and bring the thread forward to the front of the hook. Bend the front tag of wire out at a 90 degree angle.
Remember to keep this base layer of thread smooth and neat.
Cut off the front tag with your wire scissors.
The tag should be cut at an angle.
Clean up the trimmed front with a few wraps of thread.
The trimmed front should have a nice taper to it.
As with the wire rib, bring the rear tag of wire up to a 90 degree angle and then begin the wrapping by coming underneath and up along the nearside of the hook.
Continue to make tight touching wraps forward and secure the wire to at the front on the nearside of the hook opposite of the tie in point. To help make tight wraps it is a good idea to wrap the wire over the front edge of the previous wrap and let it slide into place in front of that previous wrap.
Bend the tag end of wire out at a 90 and trim with your wire scissors.
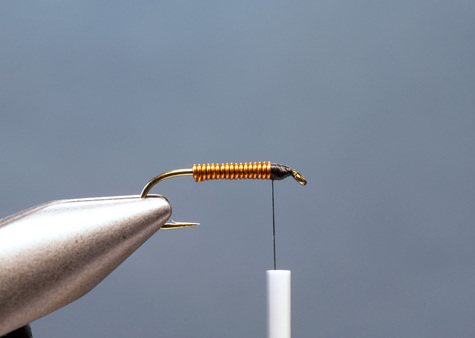
Secure and cover the trimmed end of wire with thread and you should have a neatly tapered front to you fly.
Tying a tinsel rib.
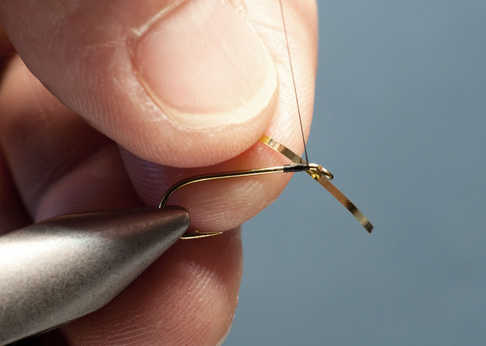
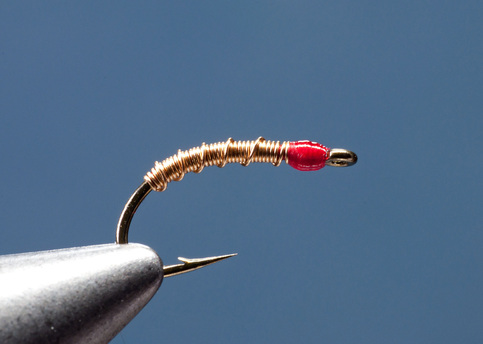
Tie your tinsel in by placing it at approximately a 45 degree angle to the far side of the hook shank.
The way we work with tinsel and it's uses are very similar to wire. However there is a difference that makes for a few changes. It is flat. Tinsel is also most often two-toned. It is one color on one side and a different color on the other. This must be taken into consideration so you achieve the color you are after. In this tutorial, I want a gold rib. The tinsel is gold and silver.
NOTE: The color you want to show should be facing you.
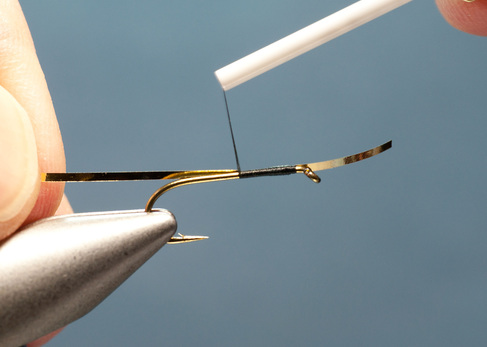
Continue with neat smooth wraps to tie in the tinsel along the far side of the hook shank. Stop your thread somewhere between the hook point and the barb of the hook. A good general rule to follow. Then trim your front tag off.
With the neatest of wraps move your thread forward to the front of the hook. With the wire we lifted the wire to a 90 from the hook shank. We do the same with the tinsel, BUT (this is important) when you grasp the tinsel and prepare to wrap it make sure it folds across itself in an 45 degree angle. This will form a nice neat transition into the wraps and not just a nasty segment of twisted up tinsel. You should be able to see the fold the tinsel is making in the photo at the left.
Here I have started the initial wrap. You can see as I bring the tinsel under the hook toward me the silver side is what you see. This is good. If you want a gold rib.
As I bring the tinsel up the gold side is showing. That's what you want.

Continue forward with your wraps and finish as you did in the wire rib tutorial.
Forming a tinsel body.
Lay down a smooth base of thread that covers the length of the hook shank. The smoother the better for this one. Then attach your tinsel like we did in the tinsel rib tutorial, but this time don't tie the tinsel in along the entire length of the hook shaft. Just use a few wraps of thread to secure it ending at the rear of the thorax area. You should look like the photo on the right before starting the next step.
Sometimes we just want a lot of flash. This is how you do it.
Begin wrapping the tinsel to the rear of the hook. Make sure your tinsel folds initially as described in the tinsel rib tutorial above so your tying is neat and the right color is showing. Here we are tying a gold body.
NOTE: Unlike the wire, it is very important that you maintain even tension on the tinsel. It will not stay where it is put if you give it the slightest slack.
Here we have formed a nice smooth body of tinsel and are at the rear of the hook shank just above the hook point. We are not done! We are going to reverse direction and return to the front of the fly with the next wrap. Maintain your tension on the tinsel.
As you bring the tinsel under the hook slightly change direction so it is now angled forward and ready to wrap to the front of the hook.
Wrap it neatly forward and tie it off at the front of the fly. When wrapping forward you should try to overlap the the tinsel a little bit with each wrap.
Trim off the tinsel tag and clean up the tie off point.
TRY THIS!
If you have gone through the previous wire and tinsel tutorials why don't you try to tie a tinsel body with a wire rib? You can do it. Be sure to take care of your thread wraps, especially at the head of the fly. Use only what you need to get the job done.
1. Attach the wire for the ribbing and secure it along the length of the hook shank.
2. Bring your thread neatly forward to the front of the fly.
3. Attach the tinsel and follow the directions for the tinsel body.
4. Wrap the wire rib forward to the front of the fly and tie off.
NOTE:
A rib does not always have to be wrapped clockwise along the shank of the hook. Sometimes it makes sense to "counter wrap" the rib material to better secure the underlying material. If you desire to do a "counter wrap" of the wire there is one little change to these rib tutorials. Tie the wire or tinsel in along the near side of the hook as opposed to the far side and proceed as normal. That's it!
Fly Patterns with Wire and Tinsel
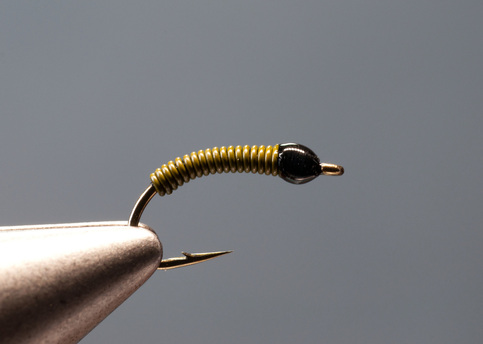
Brassie
Hook: heavy wire nymph. #14-20
Thread: black
Body: copper wire
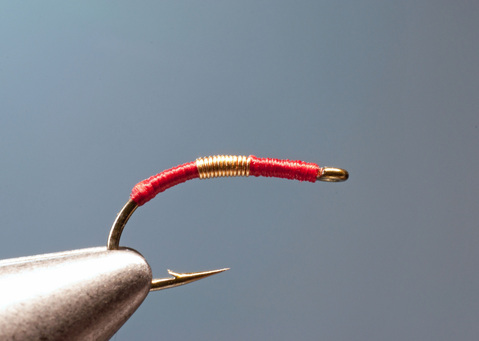
Brassie
Hook: curved shank heavy wire hook
Thread: red
Body: gold wire (Wrap this one like in the tinsel body tutorial. One layer back but open wrap the wire forward)
Wired Caddis
Hook: curved shank heavy wire hook. #10-18.
Thread: black or brown
Body: colored or copper wire, large enough to build a segmented appearance.
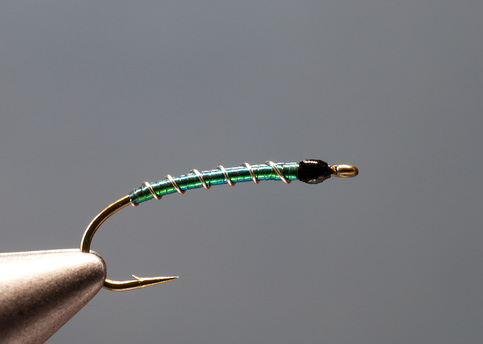
Peacock Chironomid
Hook: 3x long curved shank hook
Thread: black
Rib: gold wire
Body: peacock colored tinsel (this comes as peacock and copper tinsel)
Bloodworm with Bling
Hook: heavy curved shank. #14-#20
Thread: red
Rear: thread
Midsection: gold wire. small
Front: thread
This is the puzzler of Lesson #4. You figure it out.