About Your Tying Equipment
The equipment you choose for your tying adventure can be simple or as specialized in design as you desire. It can be easy on your budget or break the bank. There are many options and directions one can take. You will need to do a little research and find what tools best fit your needs. I'm not going to promote manufacturers on this site. However, I would like to give a brief sampling of the equipment available. Some of the tools are essential for tying flies while some of them are an added non-essential luxury.
Essential Equipment
Essential item #1: Vise
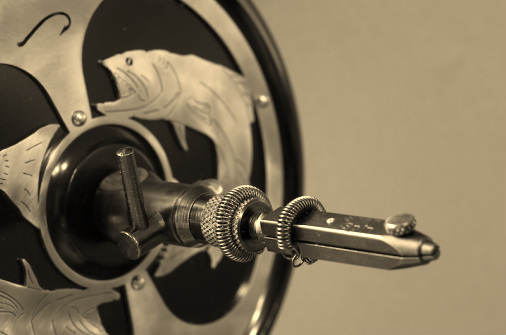
A vise is used to hold the hook securely in the process of tying a fly. Securely is the key here. Nothing in tying is more annoying then a vise that will not safely secure the hook. This is the vise's job. This should be the tier's number one consideration when choosing a vise. A tier's attachment to a particular vise can easily can easily rival a person's favorite sports car or sport's team. I hope you find such a vise. A quality vise can cost roughly $50 - $1000. Remember, they all have the same job. Hold the hook securely. There are few vises over $50 which are not functional and durable. On the other hand, there are very few that I have found under $50 that are even remotely worth considering. I recommend a beginning tier should expect to spend at least $50 on a first vise. I do not recommend any of the fly tying kits available. More often than not, the kit will be met with dissatisfaction in a cheap vise or unsatisfactory tools. Looking for used equipment can be a good route for those on a tight budget. Fly tiers are often upgrading their equipment.
There are essentially 3 styles of vises for the tier to consider: standard non-rotary, rotary and true-rotary.
Simplicity and economy are the main attractive features on most standard non-rotary vises. Non-rotary means that the vise jaws will not rotate in a circular motion. This is beneficial to view the top, bottom and sides of the fly while still in the vise. This feature is not necessary to tie a durable, functional, good looking fly. It is helpful. Many standard non-rotary vises will allow the tier to adjust the angle of the jaws. Most quality standard non-rotary vises will cost in the $50-150 range.
Rotary vises generally cost a bit more but allow rotation of the vise jaws in a 360 degree angle while the hook is in place. This feature is handy to view the fly on all sides during construction. The tier can check to see if wraps are strait, if materials are tied in where the ought to be and can aid in cementing the head of the fly. Most rotary vises will be in the upper half of the $50-$200 range.
True-Rotary vises allow the vise jaws to rotate 360 degrees like the rotary vises but with the added feature of the hook rotating on an axis along the hook shank. The hook will rotate but the hook shank will remain in place. This allows all the viewing of the rotary vise but also includes the option of rotating the jaws to attach and wrap material on the hook. With some practice, this can greatly increase tying efficiency and uniformity. Wide ranging in price, true-rotary vises start about $100 and go over $1000.
Besides the 3 styles of vises, there are 2 types of bases to consider. A clamp base allows the vise to attach along the edge of a table top or tying station. The advantage here is the clamp insures the vise is not going to move and is stable. It is also the lighter weight option. The disadvantage is most clamps are somewhat limited to the depth of the table top and may not fit thicker edges. There are a few clamps available that are more adjustable. The other option is a weighted pedestal base. A weighted pedestal base is simply a very heavy base with a socket that the post of the vise fits into. The heavier the better. The advantage is the vise can travel and be set up virtually anywhere. The disadvantages are weight and the vise is not as solidly mounted when compared to a clamp base.
Most of the major vise manufacturers make models in more than one of these styles and offer different bases.
Take a look at these links for a good overview of some choices and considerations available.
http://www.flyfishohio.com/Vise%20Review%201/Fly_Tying_Vise_Shoot-Out.htm
http://www.flyfisherman.com/2012/08/27/the-best-vises/
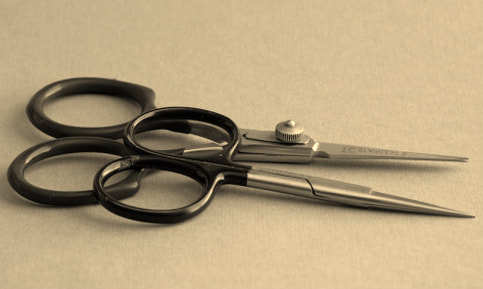
Essential Item #2: Scissors
Scissors could arguably be essential item #1. Scissors, like the vise, are not a piece of equipment to go cheap on. A good pair of scissors will cost between $10 and $30. There are scissors made especially for fly tying. These are most valuable and will serve the tier better than scissors for sewing. Commonly made of steel or titanium, tying scissors come in a variety of lengths and shapes. The scissor blades can be serrated or smooth. The blades can be fine to stout and straight or curved. The scissor length is also variable. A shorter length scissor will generally allow more control over the cutting of materials. It is a good idea to have two pair of scissors. A shorter fine pointed pair is good for closely cutting thread and materials in small spaces. Another pair of bigger scissors for the grunt work of clipping tinsel, wire, hair and other rough items will dramatically increase the life of the scissors used for fine work.
Scissors could arguably be essential item #1. Scissors, like the vise, are not a piece of equipment to go cheap on. A good pair of scissors will cost between $10 and $30. There are scissors made especially for fly tying. These are most valuable and will serve the tier better than scissors for sewing. Commonly made of steel or titanium, tying scissors come in a variety of lengths and shapes. The scissor blades can be serrated or smooth. The blades can be fine to stout and straight or curved. The scissor length is also variable. A shorter length scissor will generally allow more control over the cutting of materials. It is a good idea to have two pair of scissors. A shorter fine pointed pair is good for closely cutting thread and materials in small spaces. Another pair of bigger scissors for the grunt work of clipping tinsel, wire, hair and other rough items will dramatically increase the life of the scissors used for fine work.
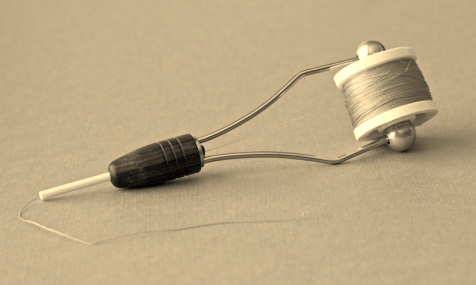
Essential Item #3: Bobbin Holder
A bobbin holder is used to hold the spool of thread and feeds the loose thread end through a tube to give better control over the application of the thread. These are meant to fit nicely in the palm of your hand and to hold the thread at a fixed tension. The most important consideration in a bobbin holder is the thread feeding tube. This tube is often made of metal or ceramic or sometimes a metal tube with a ceramic insert. The tip of the tube can be cut or flared or sometimes fitted with a smooth bead. The least expensive bobbin holder will be a metal unflared cut tube. Honestly, these are only good for use with wire and that is even debatable. Cheaper bobbin holders will often cut or fray thread when applied. This will only make your tying experience miserable. Most tiers use some type of ceramic bobbin holder today and reserve the metal tubes for wire applications.
A bobbin holder is used to hold the spool of thread and feeds the loose thread end through a tube to give better control over the application of the thread. These are meant to fit nicely in the palm of your hand and to hold the thread at a fixed tension. The most important consideration in a bobbin holder is the thread feeding tube. This tube is often made of metal or ceramic or sometimes a metal tube with a ceramic insert. The tip of the tube can be cut or flared or sometimes fitted with a smooth bead. The least expensive bobbin holder will be a metal unflared cut tube. Honestly, these are only good for use with wire and that is even debatable. Cheaper bobbin holders will often cut or fray thread when applied. This will only make your tying experience miserable. Most tiers use some type of ceramic bobbin holder today and reserve the metal tubes for wire applications.
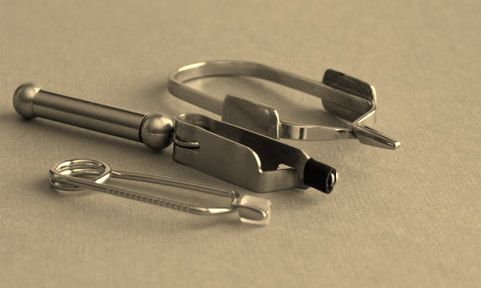
Essential Item #4: Hackle pliers
I list hackle pliers as essential. I think they are. Hackle pliers are spring operated pinchers used to grab the fine feather tips of hackle in order to wrap them neatly around the hook. Yes, fingers can be used for this but life tying flies will be much, much easier if you purchase a pair of hackle pliers. The expense is minimal. Sometimes the thread will break in the middle of tying a pattern. Hackle pliers are useful for holding the broken thread tag, keeping it from unraveling, while you reattach the thread.
I list hackle pliers as essential. I think they are. Hackle pliers are spring operated pinchers used to grab the fine feather tips of hackle in order to wrap them neatly around the hook. Yes, fingers can be used for this but life tying flies will be much, much easier if you purchase a pair of hackle pliers. The expense is minimal. Sometimes the thread will break in the middle of tying a pattern. Hackle pliers are useful for holding the broken thread tag, keeping it from unraveling, while you reattach the thread.
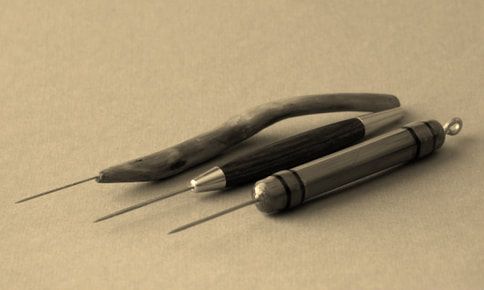
Essential item #5: Bodkin.
The bodkin is simply a needle with a handle. Is it essential? Yes it is. The bodkin is the multi-tool of tying. Uses for the bodkin include: roughing up fur dubbed bodies, separating the fibers of materials, shifting materials on the fly, picking out tied down hackles fibers, cleaning the hook eye and applying cement.
The bodkin is simply a needle with a handle. Is it essential? Yes it is. The bodkin is the multi-tool of tying. Uses for the bodkin include: roughing up fur dubbed bodies, separating the fibers of materials, shifting materials on the fly, picking out tied down hackles fibers, cleaning the hook eye and applying cement.
Non-Essential Equipment ( but helpful )
Tying Light
A light is almost essential. If you don't have natural light to tie by, then seriously consider an adjustable desk light of some kind and install a natural spectrum light bulb.
Bobbin Threader
This is a handy tool with a loop of somewhat stiff wire inserted into a handle. The bobbin threader is used to pull the thread through the tube of the bobbin before you begin tying.
Hair or Hackle Stacker
This is a two part tool. It is simply a smaller tube fitted loosely into a base tube. The tips of hackle or hair is placed tip down into the tube. The tool is tapped sharply on a hard surface forcing the tips of the material to the bottom and aligning the tips to the same plane.
Whip Finisher Tool
There are a couple styles of these. This tool aids in tying the whip finish knot used to tie off the head of the fly. The whip finish can be tied very nicely by hand but some prefer to use the tool.
Dubbing Twister
This is a tool used to twist a loop of thread fitted with various materials to form a durable rope of material to apply to the fly. There are a number of configurations from a simple hook to a two hook weighted design. Often, a pair of hackle pliers can be functional in place of this tool.
Dubbing Rake
A very helpful tool used to "rake" across fur that is still attached to the skin. It is very effective in pulling out the soft underfur of material. It is also helpful as a "third hand" to manipulate material on the fly when tying.
Flat Needle-nosed Pliers
Pliers helpful in bending down the barbs of hooks for barbless fishing.