Beginning Basics
Throughout this site I will continue to stress the importance of tying flies with a purpose in mind. The lessons will start with very basic concepts and techniques and grow incrementally. A quality fly is a neatly tied fly. A quality fly is a durable fly. A quality fly is a well proportioned fly. A quality fly is a fly that behaves as intended during its presentation. Do you want to tie quality flies? Then sit back, get your tying equipment ready and continue reading.
Unlike simply learning a pattern and trying to tie it only to be frustrated because it didn't turn out the way you expected, I want you to grow in your tying abilities slowly and confidently. Make sure each fly tied is quality. Be honest with yourself. We all tie a junk fly every now and then. For whatever reason it just doesn't come out the way we want. Be honest with yourself and strip the junk flies down to the hook and start over. Gradually, as you progress in your lessons, you will be building a tying skill set to last you the rest of your life. You will also have the skill set to know what you want from an artificial fly (what does it mimic, how will it behave in the water, what are the best materials and techniques to achieve what you want). You will be able to mentally design a fly pattern for your needs, your water, and tie it purposefully to meet those needs. This is the idea behind "Purposeful Tying."
This lesson teaches basic techniques that need to be learned by every tier before they begin tying. Be sure to look over the previous introductory lessons on Equipment, Hooks and Thread so that you can follow the instructions. Pay special attention to the parts of the hook as these will be often used as reference points during instruction. Also, review the names of the tools in the equipment section.
Hook Placement
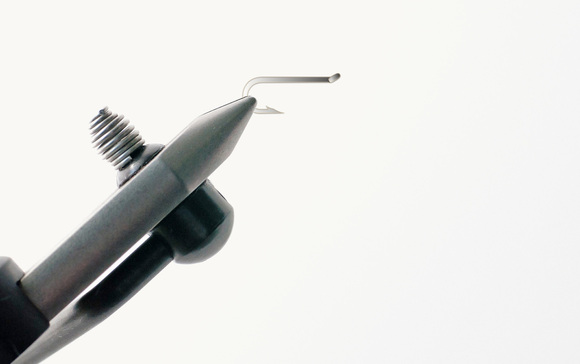
The hook is held in the vise jaws. The photo to the left shows the proper placement. The angle of most vise jaws are adjustable. The angle is best in the 30 to 60 degree range. Take into consideration the balance of the vise when tying especially with a pedestal base. The shaft of the hook should be level and parallel to the table the vise is attached to. The vise jaws should grab the hook in the bottom left quadrant of the hook bend. Try not to grab the hook too deep and not just by the very tips of the vise. Too close to the tips can chip some vise tips or shoot the hook out while tying. This is a safety hazard.
Holding the Bobbin and Holder
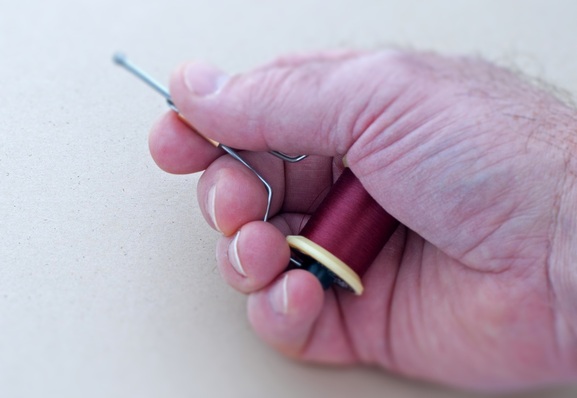
Place the threaded bobbin with the holder in the palm of your hand. Use the tip of your thumb and forefinger to grasp the bobbin holder post an inch or two from the tip. From here you can use the pad of your thumb and the base of your pinky finger to adjust the tension on the bobbin while tying. Being able to adjust the tension while tying is an important aspect of thread control. Try to achieve this in a comfortable manner.
Place the threaded bobbin with the holder in the palm of your hand. Use the tip of your thumb and forefinger to grasp the bobbin holder post an inch or two from the tip. From here you can use the pad of your thumb and the base of your pinky finger to adjust the tension on the bobbin while tying. Being able to adjust the tension while tying is an important aspect of thread control. Try to achieve this in a comfortable manner.
Attaching the thread to the hook
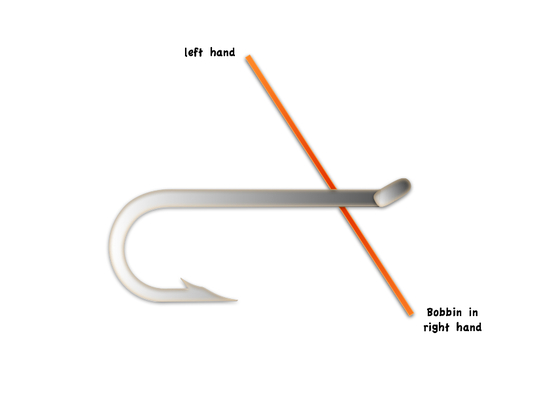
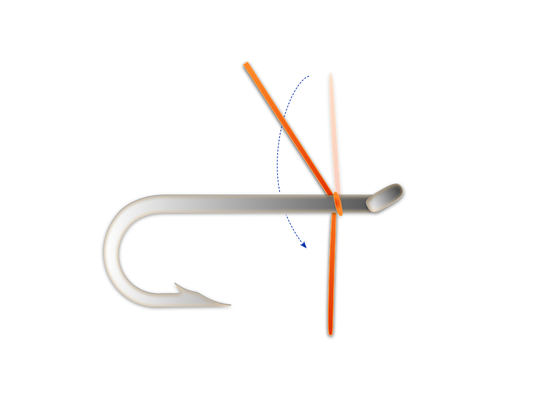
1. Begin attaching the thread to the hook by holding the tag end of the thread in your left hand and the bobbin in your right. Stretch the thread out to a 45 degree angle and place it behind the hook about the eye's distance back from the eye of the hook.
IMPORTANT NOTE:
Tension must be maintained on both ends of the thread until the thread is tied in. Only then, you can release tension on the tag held in your left hand. Tension on the thread attached to the bobbin must be retained throughout the entire tying process. Any slack in the bobbin thread and your work will most likely unravel.
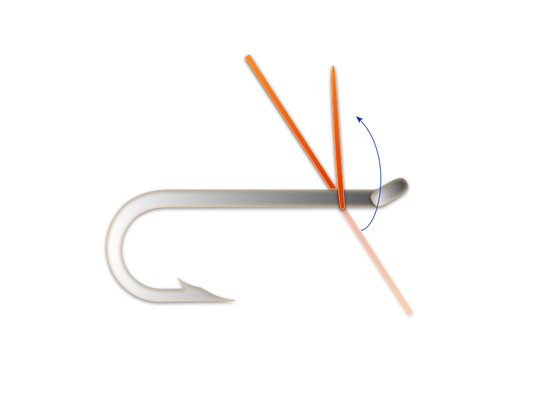
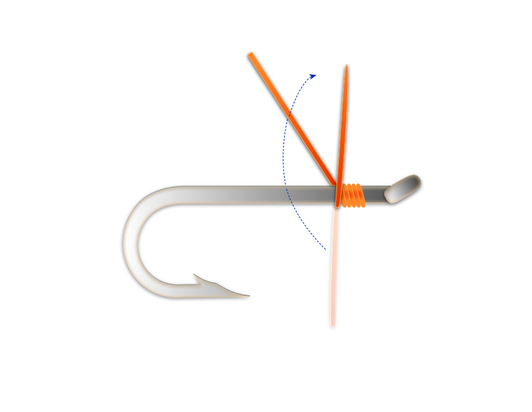
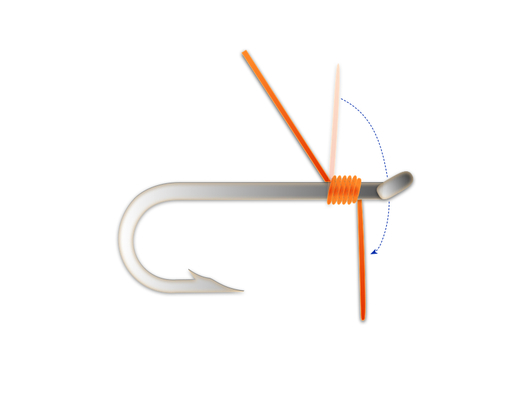
2. Keeping constant tension on both ends of the thread bring the hand with the bobbin up in a circular motion on the side of the hook facing you.
3. Still keeping constant tension on both ends of the thread, continue to wrap around the back side of the shank with your bobbin hand, trapping the tag end of thread being held in your left hand.

4. Continue to wrap with your bobbin hand in circular motions. Make 4-5 full turns around the shank working towards the rear of the hook. Each wrap should trap down more thread from your left hand tag. You can use the angle of the thread being held to "slip" each wrap into a snug fit back against the previous wrap.
5a. After you have made 4-5 wraps back over the thread, my preference is to change direction and begin to wrap forward over the wraps you just laid down.
Another option is shown below in step 5b.
NOTE:
The option you choose is your preference. I rarely use option 5b unless I am tying a fly that will have no hackle. Why this is my preference will be shown in one of the beginning tying lessons.
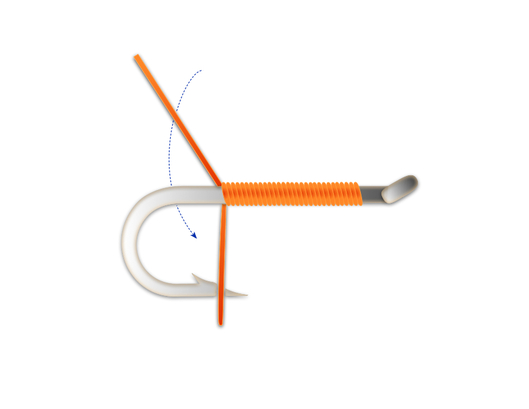
5b. The other option is to continue towards the rear of the hook shank with your wraps. If you chose this option, your thread is attached and you are ready for the next step. You can safely trim off the tag of thread that was in your left hand.
6. If you chose preferred option 5a and reversed your thread wraps, proceed to make touching wraps forward over the previous wraps. Stop after you have wrapped one more wrap forward than you did towards the back. If you initially made 5 wraps toward the rear of the hook, make 6 forward. You have now attached your thread and are ready for the next step. You can now safely trim the tag of thread you held in your left hand.
Finishing the thread.
When you are finished tying the fly you must securely "finish" the fly. This is achieved by tying a knot, usually just behind the eye of the hook. There are a number of ways to do this and also a number of tools to accomplish each knot. The two most common knots used are the Whip Finish and the Half-hitch Finish. The simplest knot to use is the half-hitch. It works but is not as secure as the whip finish. I suggest you learn the whip finish. But, in the meantime, if you want to get started right away use the half-hitch. Make sure you add a bit of head cement to the half-hitch knot. The half-hitch is also a good knot to know if you need to stop in the middle of tying a fly to perform another function. You can use the half-hitch to secure the thread so it doesn't unravel. You will see an example of this used in the first lesson titled Thread Bodies.
NOTE:
A little search of the "net" and I found these well done instructions.
Whip Finish by hand.
http://flyfishing-and-flytying.co.uk/articles/view/its_knot_difficult/
Materelli style whip finish tool.
http://www.yourepeat.com/watch/?v=Z1V9mUufmd8&start_at=0&end_at=162
Thompson style whip finish tool.
http://www.yourepeat.com/watch/?v=1kXBMDRJq0U&start_at=0&end_at=133
Half-hitch.
http://www.youtube.com/watch?v=mjZo7WFkS-Q